Beginner Fresh Milled Sourdough
This beginner fresh milled sourdough uses 100% freshly milled hard white wheat at 78% hydration, with a long cold retard so a brand-new baker can pull a tender, open-crumb loaf on the first try.
Key Takeaways
- 100% fresh milled hard white wheat at 78% hydration is forgiving for first-time sourdough bakers.
- A 60-minute autolyse is the single biggest crumb upgrade — never skip it with fresh flour.
- Watch for ~60% rise in bulk, not a fixed time. Fresh milled doughs ferment faster than white flour.
- A 12–18 hour cold retard builds flavor and makes scoring much easier.
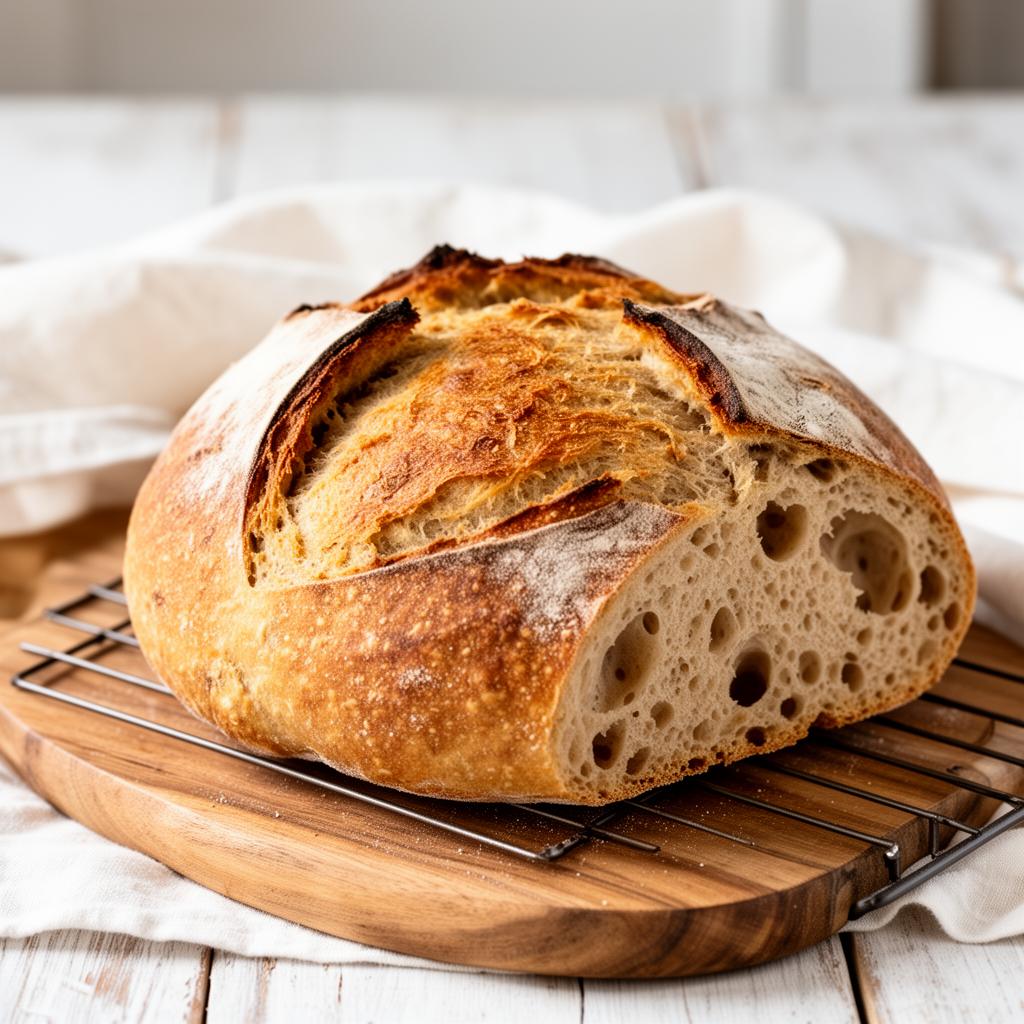
- Cool fully (90+ minutes) before slicing or the crumb will read gummy.
About this recipe
If you have ever felt that fresh milled sourdough was reserved for experienced bakers, this recipe is designed to prove otherwise. Fresh milled flour behaves differently from store-bought whole wheat: the bran is sharper, the germ is still alive, and the flour drinks water more slowly. Beginners often get pucks and gum-line crumb not because they did something wrong, but because the recipe was never written for fresh flour in the first place. This loaf is. It uses 100% freshly milled hard white wheat for a mild flavor that wheat-skeptics actually enjoy, an extra-long autolyse so the bran fully hydrates, and a generous 78% hydration that fresh flour can comfortably handle. A slow overnight cold retard does most of the work — you get the flavor of a 24-hour sourdough without standing over the dough. The single biggest tip for a beginner: trust the timeline, not the clock. Fresh milled doughs ferment faster than white-flour recipes you may have made before, so watch for a 50–75% rise in bulk rather than a fixed two-hour window. Use a clear straight-sided container and mark the start line. If it hits that line in 4 hours instead of 6, shape early. You will also want a young, active starter. Feed it 6–10 hours before mixing so it peaks while you are autolysing. The recipe assumes a 100% hydration starter; if yours is stiffer, just bump the water by 10 g. No Dutch oven? A heavy cast-iron pan with a stainless bowl inverted on top works perfectly for the first 20 minutes of steam, which is the only part of the bake that really matters for ear and oven spring.
Prep: 45 min
Bake: 45 min
Hydration: 78%
Ingredients
- Freshly milled hard white wheat flour500 g
- Water (90°F / 32°C)390 g
- Active 100% hydration sourdough starter100 g
- Fine sea salt11 g
- Rice flour for dusting bannetonas needed
Instructions
- 1
Feed your starter 1:5:5 (20 g starter, 100 g flour, 100 g water) 6–10 hours before mixing. It is ready when it has doubled and smells sweet and yeasty.
- 2
Mill the wheat berries on the finest setting your mill allows. Weigh out 500 g of flour.
- 3
In a large bowl, whisk 390 g of warm water into the flour until no dry spots remain. The dough will look shaggy and rough — that is correct. Cover and rest 60 minutes for autolyse.
- 4
Add 100 g of peaked starter and 11 g of salt to the dough. Pinch and squeeze until fully incorporated, about 2 minutes.
- 5
Cover and rest 30 minutes.
- 6
Perform 4 sets of stretch-and-folds, 30 minutes apart. Wet your hand, grab one side of the dough, stretch up, fold over. Rotate the bowl 90° and repeat 4 times per set.
- 7
After the last fold, cover and bulk ferment at 76–78°F until the dough has risen about 60% and looks jiggly, slightly domed, with a few bubbles on the surface. Total bulk is usually 5–7 hours including the folds.
- 8
Turn the dough onto a lightly floured counter. Pre-shape into a loose round and rest 20 minutes, seam-side down.
- 9
Shape into a tight boule: flip the round seam-side up, fold the edges into the center to build tension, then flip seam-side down and rotate against the counter to seal the bottom.
- 10
Place seam-side up in a rice-floured banneton. Pinch the seam closed if needed. Cover and refrigerate 12–18 hours.
- 11
Preheat oven and Dutch oven to 500°F (260°C) for 45 minutes.
- 12
Turn the cold loaf onto parchment, score one decisive 4-inch slash at a 30° angle. Lower into the hot Dutch oven, cover.
- 13
Bake covered 20 minutes at 500°F, then reduce to 450°F (230°C), uncover, and bake 20–25 more minutes until deeply browned (internal temp 205°F / 96°C).
- 14
Cool on a wire rack at least 90 minutes before slicing — fresh milled crumb sets as it cools, and slicing hot leads to gummy texture.
fresh milled baking basics — hydration, gluten development, and grain choice tips that make this recipe work.
Learn about this grain: Hard White Wheat guide — flavor, milling notes, baking tips, and four in-depth guides on hydration, storage, and common mistakes. Or browse more Hard White Wheat recipes.
Learn a technique
All guides →- How to Stretch and Fold DoughEvery 30 minutes during bulk ferment, lift one side of the dough, stretch up, and fold over the top. Rotate 90° and repeat.
- Bulk Fermentation with Fresh-Milled FlourFresh-milled flour ferments faster than commercial flour. Watch the dough, not the clock, and end bulk fermentation when volume has grown 50–75%.
- How to Shape a Batard and BouleBoules are round; batards are oval. Both rely on building surface tension by tucking the dough under itself with light, confident movements.
- Build & Maintain a Fresh-Milled Sourdough StarterA step-by-step guide to creating a robust whole-grain sourdough starter from scratch and maintaining it for weekly baking.
Related Content
Recommended Grains
Related Techniques
How to Stretch and Fold Dough
Every 30 minutes during bulk ferment, lift one side of the dough, stretch up, and fold over the top. Rotate 90° and repeat.
Bulk Fermentation with Fresh-Milled Flour
Fresh-milled flour ferments faster than commercial flour. Watch the dough, not the clock, and end bulk fermentation when volume has grown 50–75%.
How to Shape a Batard and Boule
Boules are round; batards are oval. Both rely on building surface tension by tucking the dough under itself with light, confident movements.
Build & Maintain a Fresh-Milled Sourdough Starter
A step-by-step guide to creating a robust whole-grain sourdough starter from scratch and maintaining it for weekly baking.
Cold Retard & Bulk for Fresh-Milled Sourdough
How to time and temperature-manage bulk fermentation and cold retard for fresh-milled sourdough to develop flavor without overproofing.
Fresh Milled Flour Hydration Guide
Hydration is the single variable that fixes more fresh-milled bread problems than any other adjustment. Bagged bread flour is engineered to behave predictably — milled to a uniform fine particle, aged for weeks, and stripped of the thirsty bran and germ. Fresh-milled flour is the opposite: it contains every part of the kernel, and the intact bran soaks up water slowly. The same recipe that produces a slack, sticky white-flour dough produces a dry, tight fresh-milled dough unless you increase the liquid. This guide explains why hydration matters more for fresh flour, how each grain behaves, how to read dough texture by feel, how to convert standard recipes, and how to troubleshoot the most common hydration symptoms.